Years and years ago, the first time I ever did Inktober, I decide to do it as part of something I called a “Creative Tri-month-alon”. No, it wasn’t a great name. But it was a really good challenge. Basically, I decided to do a daily creative challenge three months in a row. NaNoWriMo was still a thing (Nodevember still hadn’t started yet) and I’d recently learned about Inktober. I didn’t want to do anything over the holiday in December and there wasn’t really anything in September… so I kind of just made up Sculptember that year. I’m pretty sure I’m the first one to make that name, but it’s possible I wasn’t. So that was my Creative Tri-month-alon. I got pretty close to succeeding, too!
But… back to this year’s Inktober #
In any case, that’s not exactly what this post is about. I’ve always really enjoyed Inktober and really like the tactile feeling of putting actual pen (and/or brush) to paper. So each year, I try to at least do the Inktober event… to varying levels of success.
Well, this year, since I decided I was going to try and find my way back to social media, I figured Inktober would be an excellent vehicle for making that happen. And unlike previous years where I kind of just drew whatever I wanted for each day, I also decided that I’d try to stick to the official prompt list.
So how did I do? #
I was a little late—I finished my last Inktober drawing just today—but I did indeed finish! 31 drawings, each of varying levels of quality, completed and shared to each of my social media accounts.
I had a dumb moment near the end after I switched to a new sketchbook (my previous one had filled up). I’d thought that there was something weird with the paper (it was handmade paper in a handmade book that I’d picked up visiting Plymouth, Massachusetts last year) because my brush pen just wouldn’t put ink on the page. Stupid me, the ink cartridge in the brush pen had run empty. Duh. The paper is still weird… but the main problem was that I was an idiot.
There are a few scribbles in there that I did end up liking quite a lot (and I got a lot of positive feedback from the people who saw my shares… thank you!). However, quite a few of them were rushed, and it shows.
Still, it was a great challenge and I had a lot of fun with these, so here’s a whole gallery of this year’s Inktober scribbles, warts and all!


A 3D bonus #
On of the drawings that I ended up liking quite a bit was for the Day 14 prompt, “Trunk”. I’d done a fun close-up scribble of an elephant. After getting some really positive response on that drawing, I decided to try and find out if I could translate the concept, scribbles and all, to 3D in Blender. This is the result:
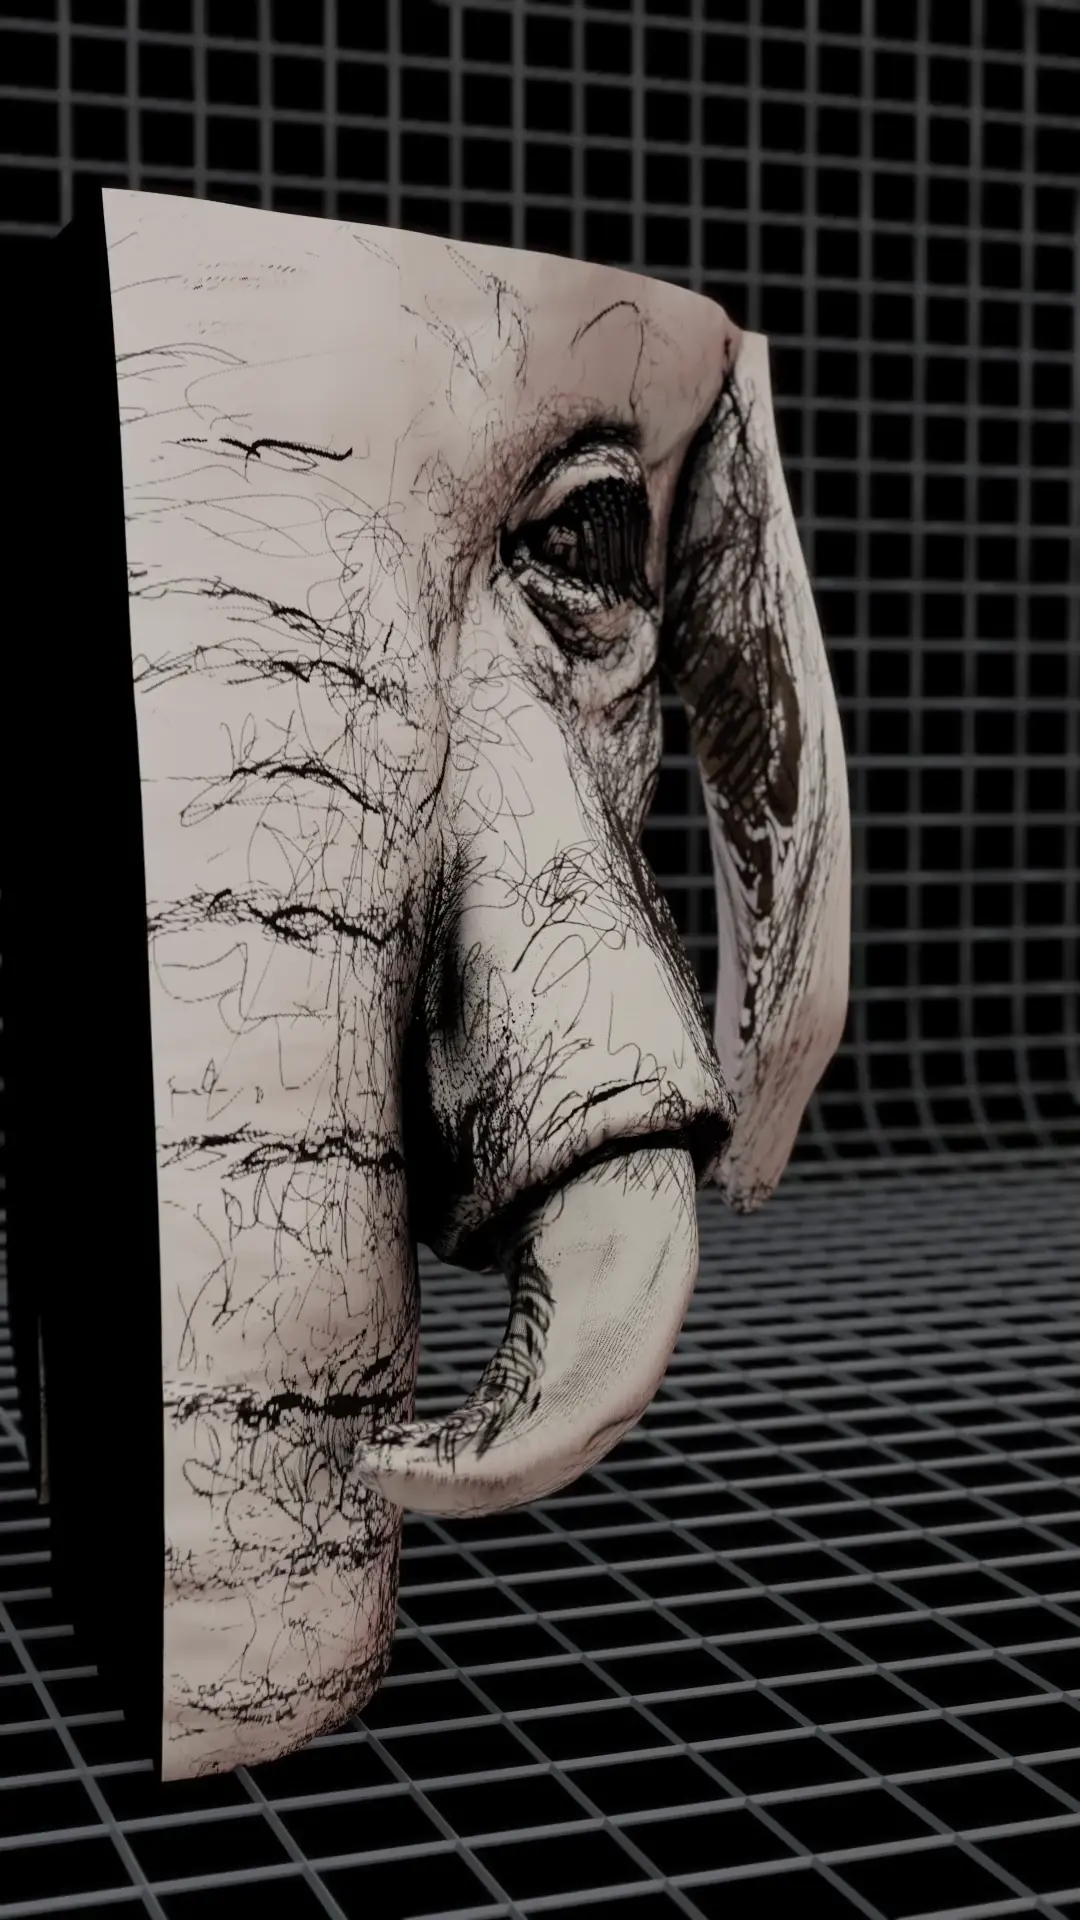
It actually turned out way better than I’d hoped… and yes, I did it in Blender. If you’re curious about the process, here’s a high-level step-by-step of what I did:
- Load the image as a reference in Blender’s 3D Viewport.
- Rough in some simple geometry for the base form of the elephant.
- Boolean all of that simple geometry together.
- Sculpt the details. I did this with a combination of Blender’s Dyntopo feature and, after I had the main parts sculpted, I switched to a remeshing workflow to get more dteails added.
- Use a simple UV projection unwrap to line up the mesh with the original drawing. This took a bit of time because I’d worked my way up to around 3 million vertices on the mesh. Moving those verts in the UV Editor took some patience… but I came up with a fun trick to ensure I got everything lined up.
- Apply the image as a texture to the sculpted mesh. Because it was projected UVs, though, some parts looked ugly from different angles. For instance, the tusk showed up drawn on the trunk. I had to fix this… and I had the geometry to make it work. So…
- Bake the texture to vertex colors on the mesh.
- Use Blender vertex paint tools (mostly in Sculpt mode) to remove or add scribbles as necessary.
That’s basically it. Of course, I did some more booleans for clean-up and I had a lot of fun tweaking the materials on the object so I get shadows to lay more nicely. And of course, I animated the camera. But overall, I think the result turned out pretty well. What do you think?